Adding an On/Off Pair User Defined Field
PCS Axis provides several pairs of installed on/off fields for recording inspection readings in a data grid or form, such as AC P/S and AC IRF; Casing P/S and Casing IRF; Foreign P/S and Foreign IRF; Insulator P/S and Insulator IRF; and Structure P/S and Structure IRF.
If PCS Axis does not provide an installed pair of on/off fields you can use to record inspection readings for a facility or continuous survey, create a custom On/Off Pair user defined field (UDF). Information in the following procedure explains how to use Field and UDF Customizations to add an On/Off Pair UDF.
Note: Editing an On/Off Pair UDF is not currently supported. This feature will be available in a future release of PCS Axis to allow changing or deleting an On/Off Pair UDF.
The current version of PCS Axis does not support editing an On/Off Pair user defined field.
Complete the following steps:
1 Click
Tools >
Field and UDF Customizations to open the
Field and UDF Customizations window (
Figure 3-29).
2 If you want to select a grid layout theme, follow these steps:
a Click
 Customize
 to open the
Column Selections dialog box (
Figure 3-32).
b Click the down arrow in Select a Layout Theme and select a theme in the selection list.
c Click
 Save
Save to close the dialog box and return to the
Field and UDF Customizations window.
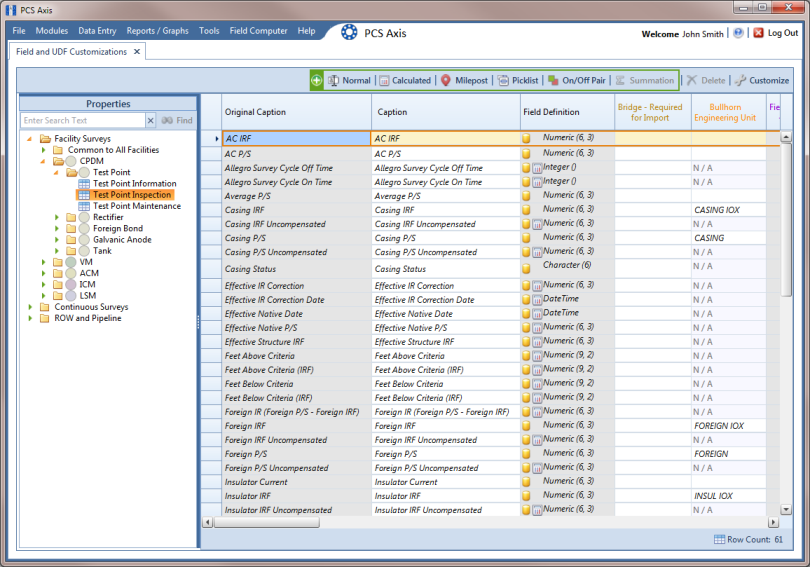
3 Double-click Facility Surveys or Continuous Surveys in the Properties panel to open the selected folder. Then select the Inspection data grid you want to set up an On/Off Pair UDF.
For example, to set up an
On/Off Pair UDF for the
Test Point Inspection data grid, double-click
Facility Surveys >
CPDM >
Test Point. Then click
Test Point Inspection (
Figure 3-59). Likewise, to set up an
On/Off Pair UDF for the
Edit ISM Data grid, double-click
Continuous Surveys >
CIS Surveys. Then click
Surveys.
Note: Clicking the Properties bar collapses the Properties panel allowing you to view more of the grid. Clicking the bar again expands the panel.
Figure 3-59. Field and UDF Customizations
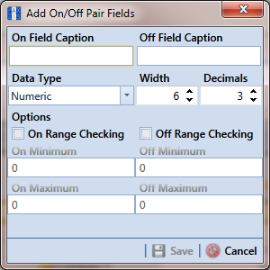
4 Click
 On/Off Pair
 in the toolbar to open the
Add On/Off Pair Fields dialog box (
Figure 3-60).
Figure 3-60. Add On/Off Pair Fields
5 Type a unique name in the fields On Field Caption and Off Field Caption.
6 Click the down arrow in Data Type and select Numeric or Integer.
A Numeric data type is a positive or negative value with decimal precision, such as 1.123 and –1.123. An Integer data type is a positive or negative whole number, such as 5 and –5.
7 If you selected the
Numeric data type earlier in
step 6, set the length of the field using the
Width and
Decimal fields (
Figure 3-60).
Clicking the up arrow in Width or Decimal fields increases the value; clicking the down arrow decreases the value.
8 If you want PCS Axis to apply Range Checking to the On reading in the On/Off Pair, complete the following steps.
Note: Range checking is the acceptable range of values allowed for data entry in an inspection field.
Setting up range checking allows PCS Axis to alert the user when an incorrect value has been entered in an inspection field. For example, if the acceptable range of values is in a range of -10 to 0 and the user enters a value that is outside this range, a warning displays allowing the user to correct the invalid entry. Data entry errors are less likely to occur when using
Range Checking. For more information, see
Setting Up Range Checking for Inspection Fields.
a Click the check box On Range Checking.
b Type a minimum range value in the On Minimum field.
c Type a maximum range value in the On Maximum field.
9 If you want PCS Axis to apply Range Checking to the Off reading in the On/Off Pair, complete the following steps:
a Click the check box Off Range Checking.
b Type a minimum range value in the Off Minimum field.
c Type a maximum range value in the Off Maximum field.
10 The
On/Off Pair UDF is now available for adding in a data entry grid. If needed, see
Working with Themes and Filter Groups for information about how to add fields in a data grid or form.