Setting Up Range Checking for Inspection Fields
Range checking is the acceptable range of values allowed for data entry in an inspection field.
Setting up range checking allows PCS Axis to alert the user when an incorrect value has been entered in an inspection field. For example, if the acceptable range of values is in a range of -10 to 0 and the user enters a value that is outside this range, a warning message displays allowing the user to correct the invalid entry. Data entry errors are less likely to occur when inspection fields are set up with range checking.
Settings apply system-wide when range checking is set up for an inspection field in Field and UDF Customizations. You can also set up range checking at the facility level using the minimum/maximum fields available in the Information and Inspections data entry grid. Range checking at the facility level overrides range checking at the system level.
Complete the following steps to set up range checking for an inspection field:
1 Click
Tools >
Field and UDF Customizations to open the
Field and UDF Customizations window (
Figure 3-29).
2 If you want to select a grid layout theme, follow these steps:
a Click
 Customize
 to open the
Column Selections dialog box (
Figure 3-32).
b Click the down arrow in Select a Layout Theme and select a theme in the selection list.
c Click
 Save
Save to close the dialog box and return to the
Field and UDF Customizations window.
3 Select an item in the Properties panel that includes the inspection field you want to set up for range checking.
For example, double-click
Facility Surveys >
CPDM >
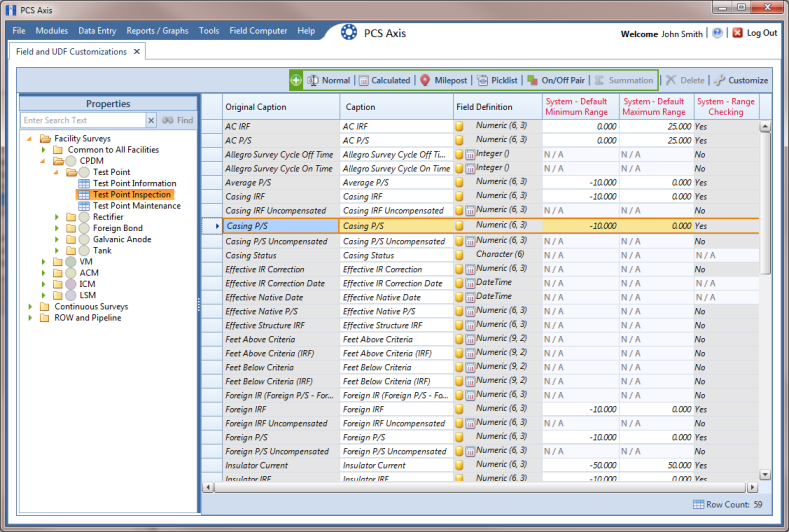
Test Point > Test Point Inspection. The grid displays related fields and property settings for the
Test Point Inspection data entry grid (
Figure 3-35).
4 Select the inspection field you want to set up for range checking. For example, select
Casing P/S as shown in the following figure (
Figure 3-35).
Note: Clicking the Properties bar collapses the Properties panel allowing you to view more of the grid. Clicking the bar again expands the panel.
Figure 3-35. Field and UDF Customizations
5 Locate the grid columns labeled System–Default Minimum Range and System–Default Maximum Range.
6 Type a minimum range value in the field labeled System–Default Minimum Range for the selected inspection field.
7 Type a maximum range in the field labeled System–Default Maximum Range field for the selected inspection field.
8 If you want to set up another inspection field with range checking, repeat
step 3 through
step 7. When you finish, click the

close icon to close the
Field and UDF Customizations window.