Setting Up a Data Entry Field as a Standard Picklist
A Standard Picklist is a list of acceptable choices for a field in a data entry grid that a user selects from when entering data. This feature improves data consistency and accuracy by allowing users to select from a list of predefined choices instead entering data manually.
For example, setting up a picklist with valid repair codes or status conditions allows users to choose from a list of valid items instead of typing information to describe the repair status or condition of a facility test station or pipeline.
A Standard Picklist contains a list of valid items for selection, a description of each item, and a value assigned to each item that determines the sorting order of items in the list.
Note: A Standard Picklist in PCS Axis is similar to a validation table in PCS.
To set up a data entry field as a Standard Picklist, follow these steps:
1 Click
Tools >
Field and UDF Customizations to open the
Field and UDF Customizations window (
Figure 3-29).
2 If you want to select a grid layout theme, follow these steps:
a Click
 Customize
 to open the
Column Selections dialog box (
Figure 3-32).
b Click the down arrow in Select a Layout Theme and select a theme in the selection list.
c Click
 Save
Save to close the dialog box and return to the
Field and UDF Customizations window.
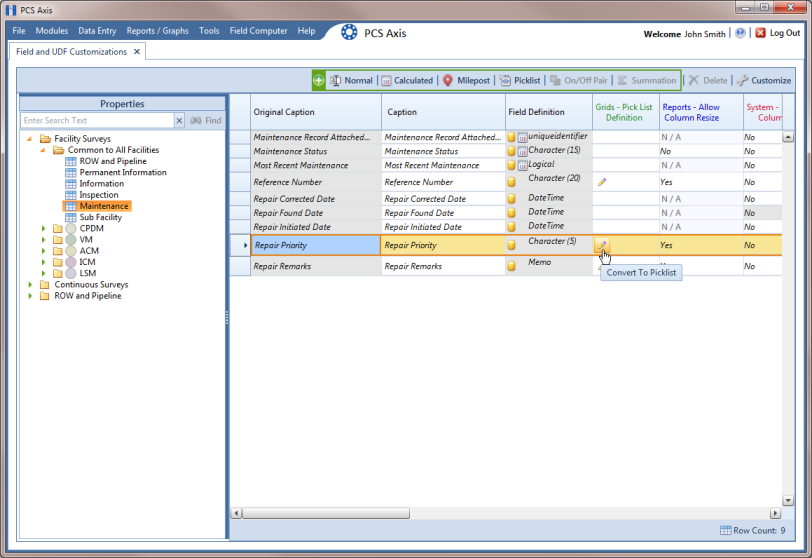
3 Select an item in the Properties panel that includes the data entry field you want to set up as a Standard Picklist.
For example, double-click
Facility Surveys >
Common to All Facilities >
Maintenance to display a grid with fields and property settings related to all
Maintenance data entry grids (
Figure 3-45).
Note: Clicking the Properties bar collapses the Properties panel allowing you to view more of the grid. Clicking the bar again expands the panel.
4 Using the horizontal scroll bar near the bottom of the grid, display the grid column labeled Grids–Picklist Definition. Then select the data entry field you want to set up as a Standard Picklist. For example, select Repair Priority as shown in the following example.
Figure 3-45. Field and UDF Customizations
5 Convert the selected data entry field to a
Standard Picklist field. Click the edit icon

in the
Grids-Picklist Definition field for the data entry field selected earlier, such as
Repair Priority (
Figure 3-45).
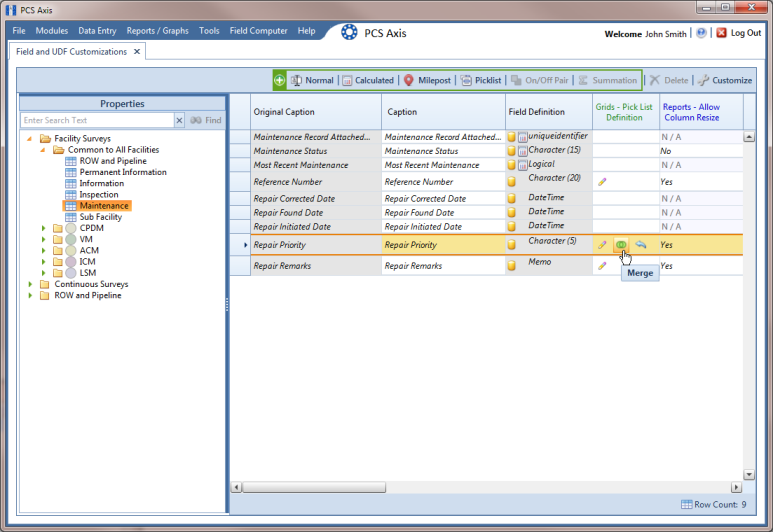
When a data entry grid includes existing data for the data entry field you convert to a
Standard Picklist, PCS Axis displays a message to notify you of the number of affected records. You can either click
Yes in the message to continue converting the field to a
Standard Picklist or
No to cancel the operation. Selecting
Yes allows PCS Axis to use existing data as valid items for selection in the
Standard Picklist. Using the merge button

allows you to edit these selection items as needed (
Figure 3-46).
If you decide later you want to convert the
Standard Picklist to a normal data entry field, click the revert button

and then click
Yes when a confirmation message displays. PCS Axis then re-populates affected fields in the data entry grids with unaltered data that was available prior to the field conversion.
Figure 3-46. Field and UDF Customizations
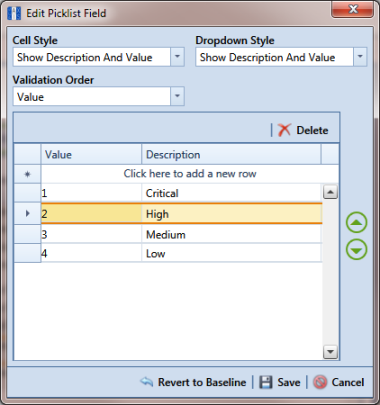
6 Click the edit icon

again for the data entry field converted earlier to a
Standard Picklist to open the
Edit Picklist Field dialog box (
Figure 3-47).
Figure 3-47. Edit Picklist Field
7 Choose an option for displaying the UDF in data entry grids. Click the down arrow in the field Cell Style and select one of the following options in the selection list:
• Show Value: Displays the assigned value of the selected item in the Standard Picklist.
• Show Description: Displays the description of the selected item in the Standard Picklist.
• Show Value And Description: Displays the assigned value and description of the selected item in the Standard Picklist.
• Show Description And Value: Displays the description and assigned value of the selected item in the Standard Picklist.
8 Choose an option for displaying items in the Standard Picklist. Click the down arrow in the field Dropdown Style and select one of the following options in the selection list:
• Show Value: Displays only the assigned value of items in the Standard Picklist.
• Show Description: Displays only the description of items in the Standard Picklist.
• Show Value And Description: Displays the assigned value and description of items in the Standard Picklist.
• Show Description And Value: Displays the description and assigned value of items in the Standard Picklist.
9 Select an option for sorting items in the Standard Picklist. Click the down arrow in the field Validation Order and select one of the following options in the selection list:
• Value: Sorts items numerically based on values assigned to items in the Standard Picklist.
• Description: Sorts items alphanumerically based on the description of items in the Standard Picklist.
• Defined: Sorts items based on the order of items listed in the Edit Picklist Field dialog box.
10 To add items for selection in the Standard Picklist, follow these steps:
a Click the message
Click here to add new row to add an empty row of fields for data entry (
Figure 3-47).
b Type a value in the Value field to associate a code number with the picklist item. Then type a description for the picklist item in the adjacent Description field.
c Press Enter on the computer keyboard to add another empty row of fields for data entry.
d Type a value in the Value field and then press the Tab key on the computer keyboard to advance the cursor to the Description field. Type a description for the picklist item.
e Repeat
step 10 "c" and
"d" as needed until all picklist items have been added. When you finish, click
 Save
Save to close the dialog box and return to the
Field and UDF Customizations window.