Editing a Picklist (Standard or Dynamic)
Information in this section explains how to edit or delete a Standard or Dynamic Picklist user defined field (UDF) in Field and UDF Customizations.
Complete the following steps:
1 If the
Field and UDF Customizations window is not open, click
Tools >
Field and UDF Customizations to open the window (
Figure 3-48).
2 Select an item in the Properties panel that includes the picklist you want to edit or delete.
For example, double-click Facility Surveys > CPDM > Test Point > Test Point Inspection to display a grid with fields and property settings related to the Test Point Inspection data entry grid.
3 Select the picklist UDF you want to work with in the grid of the Field and UDF Customizations window.
4 If you want to delete the picklist UDF, click
 Delete
 in the toolbar of the
Field and UDF Customizations window. Then click
 Yes
Yes when the
Confirm Delete message displays.
5 If you want to add or remove data items in a picklist UDF, navigate to the grid column labeled
Grids - Pick List Definition and click the

edit icon to open the
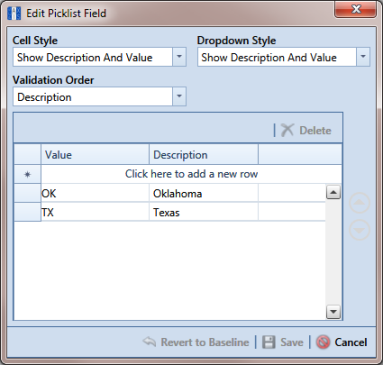
Edit Picklist Field dialog box (
Figure 3-58).
Figure 3-58. Edit Picklist Field
6 To delete a data item in the picklist UDF, select the data item and then click
 Delete
. When a
Delete message displays, click
 Yes
Yes to delete the data item or
 No
No to cancel the operation.
7 To add a data item in the picklist UDF, follow these steps:
a Click the message Click here to add a new row to add an empty row of fields for data entry.
b Associate a code with the name of the data item. Type one or more letters, numbers, or a combination of both in the Value field. Then type a description for the data item in the Description field.
c If you are adding a data item in a child Dynamic Picklist, complete the following steps:
1) Click the

parent picklist button to open the dialog box
Select Parent Picklist Values (
Figure 3-55).
2) Map a data item in the associated parent picklist to the new data item in the child picklist in the following manner. A list of data items related to the parent picklist display in the left pane of the dialog box (
Figure 3-56).
• Double-click a data item in the left pane of the dialog box to move the data item to the right pane.
You can also map data items by clicking a data item’s check box and then clicking the

right arrow button. A

check mark beside a data item indicates that data item is mapped.
If you want to unmap a data item, double-click the data item in the right pane of the dialog box to move it back to the left pane. Or, select the data item in the right pane and then click the

left arrow button.
d To add another data item, press
Enter on the computer keyboard and then repeat
step 7 "a" through
"c".
8 Click
 Save
Save to save settings and close the dialog box.