Adding an Email Report
An email report is a named set of property settings that define the content and transmission schedule of emails sent to recipients. It is the definition file that identifies the PCS Axis report, pipeline segment selection(s), and transmission schedule. Email reports are set up independently of email recipients. This allows you to assign the same email report to more than one recipient.
An email report can include any columnar report available in the Reports/Graph menu. Custom columnar reports must also be set up with the public property setting. Graph reports are not currently supported in Email Notification.
Note: For information about custom columnar reports and the
public property setting, see
Adding a Custom Report.
To add an email report, follow these steps:
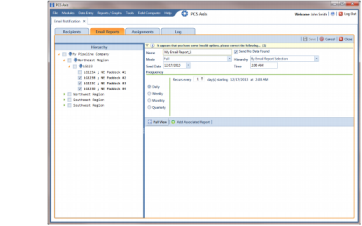
1 Click Tools > Email Notification to open the Email Notification window.
Figure 12-7. Email Reports
3 Type a name for the email report in the
Name field. Fields requiring information include a

icon, such as
Name shown in the previous example (
Figure 12-7).
The filename of the PDF report sent as an attachment in an email to recipients includes the Name of the email report and transmission date. This same information is used as the Subject of the email, such as My_Email_Report_03_10_2013.pdf.
Note: Clicking the

toggle button in the

information bar displays information related to required property settings.
4 Complete one of the following steps to set the check box Send No Data Found:
a To always have an email sent to recipients, including when no report data is found, click the check box Send No Data Found to place a check mark inside the check box. When no report data is found, the recipient receives a report with the message No Data Found.
b To only send a report to an email recipient when report data is found, clear the check mark by clicking the check box Send No Data Found.
5 Choose which data to include in the report. Click the down arrow in the Mode field and select one of the following options:
• Full: Report includes current and historical data.
• Incremental: Report only includes new data that has occurred since the last time the report was sent to email recipients.
6 Click the down arrow in the Hierarchy field and select one of the following options that determine which pipeline segments to include in the report:
• By Assigned Recipient: Report includes data only for those pipeline segments assigned to a recipient in the Recipients tab of Email Notification.
• By Email Report Selection: Report includes data only for those pipeline segments assigned to the email report in the Hierarchy panel of the Email Reports tab in Email Notification.
7 If you selected
By Email Report Selection in
step 6, complete the following steps to select which pipeline segments to include in the email report:
a Click the toggle arrow

in the
Hierarchy panel to view a list of pipeline segments in the hierarchy (
Figure 12-8).
Figure 12-8. Email Reports
b Click the check box for each pipeline segment you want to include in the report. A check mark inside the check box indicates a selection. To clear a selection, click the check box to remove the check mark. In the following figure, pipeline segments LG123-D and LG123-E have been selected in the Hierarchy panel.
8 Complete the following steps to set up a transmission schedule for sending email reports to recipients.
Important: When setting up a transmission schedule, consider a time and frequency interval that does not impact other network services or computer resources.
a Choose a date to begin sending the report. Click the down arrow in the Seed Date field to select a start date using a calendar.
b If you want to override the default time set up in Options for sending reports, enter a time in the Time field. Use 12-hour time format to indicate the hour, minute, and AM/PM setting (HH:MM AM/PM).
c Choose how often to send reports to email recipients. Select one of the following options to set a Frequency schedule:
• Daily: Sends first report on the Seed Date and recurring reports at regular intervals based on the Recurs every setting.
• Weekly: Sends first report on the Seed Date and recurring reports at regular intervals based on settings for Recurs every and a day of the week selection.
• Monthly: Sends first report on the Seed Date and recurring reports at regular intervals based on day and month settings.
• Quarterly: Sends first report on the Seed Date and recurring reports at regular intervals based on the first day of each quarter.
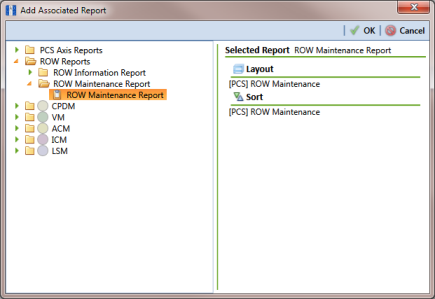
9 To select a PCS Axis report to send to email recipients, follow these steps:
a Click
 Add Associated Report
 to open the
Add Associated Report window (
Figure 12-9).
Figure 12-9. Add Associated Report
b Double-click a

folder to view a list of reports available for selection. Clicking the

toggle arrow for a report category also displays available reports.
For example, double-clicking
 ROW Reports
 >
 ROW Maintenance Report
 displays a list of reports available for selection.
c Select a report in the list to move it to the
Selected Report panel and then click
 OK
OK.
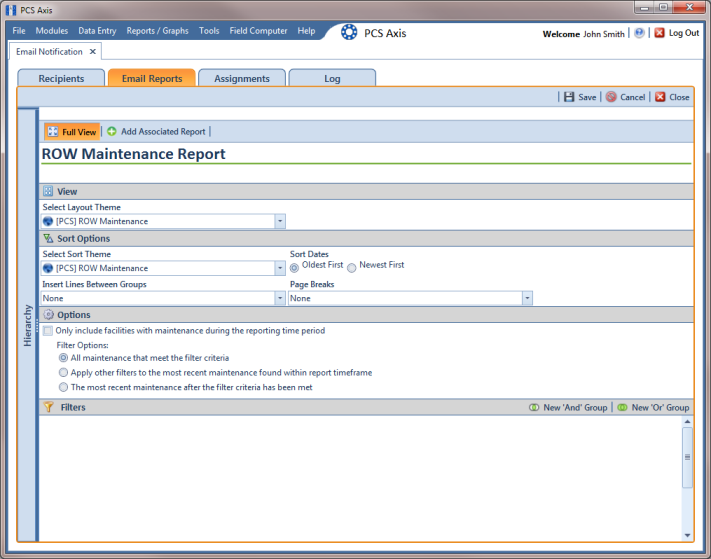
10 Click
 Full View
 to only display fields for setting report options. Clicking
Full View again displays all fields (
Figure 12-10).
Note: Clicking the Hierarchy bar hides the Hierarchy panel. Clicking the bar again opens the panel.
Figure 12-10. Email Reports
Note: Only public themes for layouts, sorts, and reports are available for selection. If you would like to use a private theme, your company’s system administrator must make your private theme a public one.
12 Click
 Save
Save.
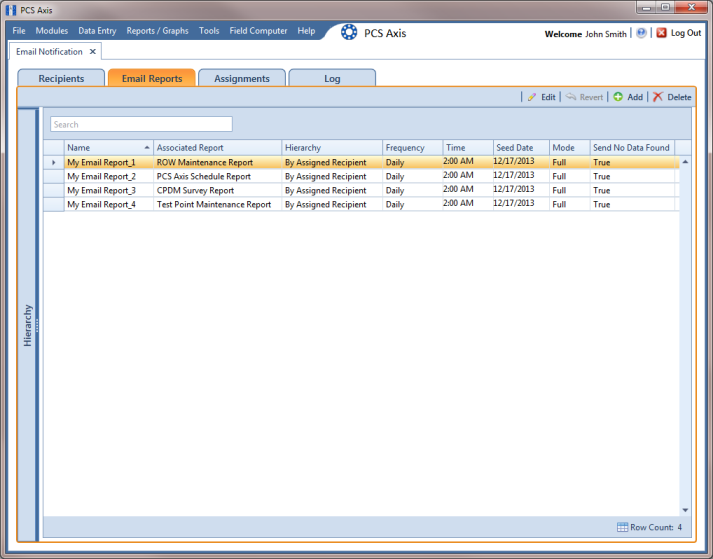
Email reports currently set up in the system display in the
Email Reports window as shown in
Figure 12-11.
Figure 12-11. Email Reports