Adding a Bridge Import Definition for an SDL Survey File
Information in this section explains how to set up a Bridge definition for importing one or more stationary data logger (SDL) survey files. The Bridge definition specifies property settings and options for importing data in PCS Axis; defines the data transfer options; and identifies the location of the SDL survey file(s).
Important: Bridge Import is an optional add-on that requires an activation key for operation. Running
Bridge Import for the first time requires you to enter your Bridge activation key. If you are unable to locate your Bridge activation key, contact PCS Technical services for assistance at
pcstechservices@aiworldwide.com. For more information, refer to
Activating Bridge Import for Operation.
To add a Bridge Import definition and import an SDL survey file, follow these steps:
1 Select one or more pipeline segments in the
Select ROWs window. Select pipeline segment(s) you want to import SDL survey files. Click
 Save
Save to close the window (
Figure 10-3).
2 Click
Tools >
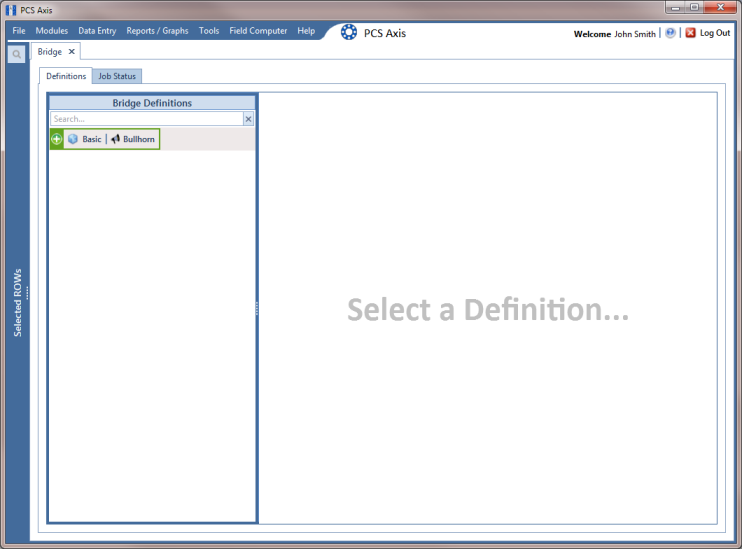
Bridge to open the
Bridge window (
Figure 10-12).
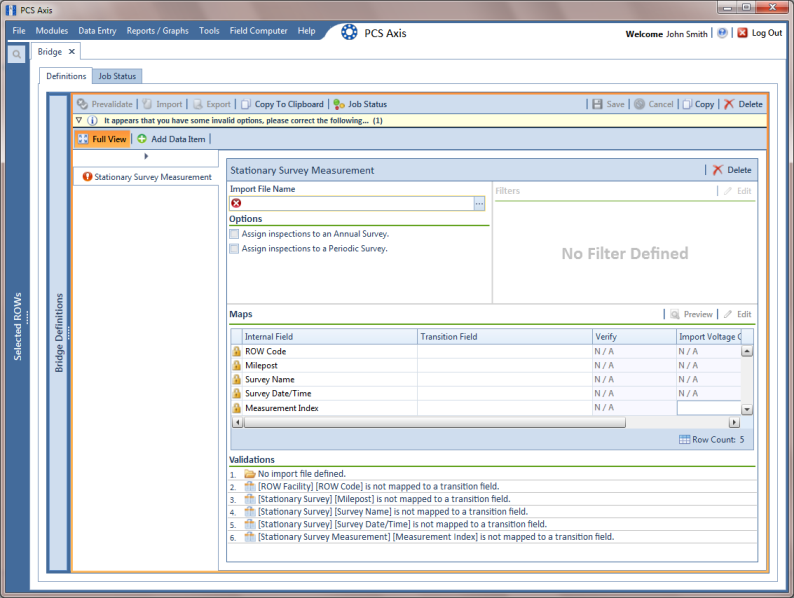
Figure 10-12. Bridge Import Definition
3 Click
 Basic
Basic to open the basic definition panel. Then click the title bar of the
Bridge Definitions panel to hide the panel. (
Figure 10-13).
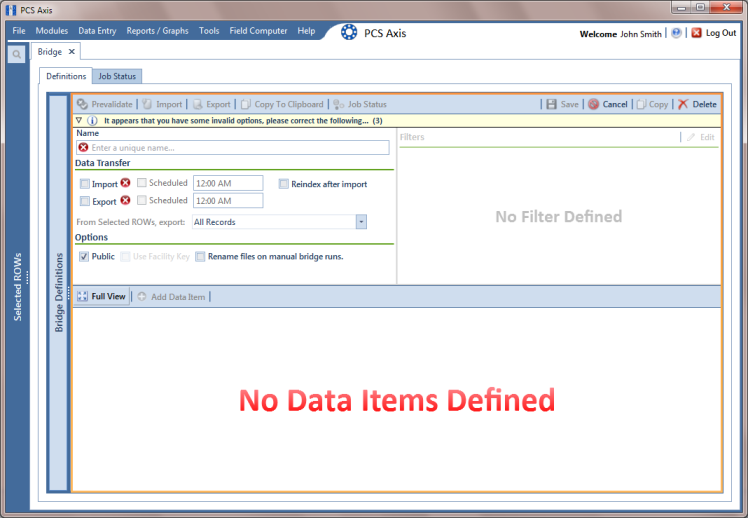
Figure 10-13. Basic Definition Panel
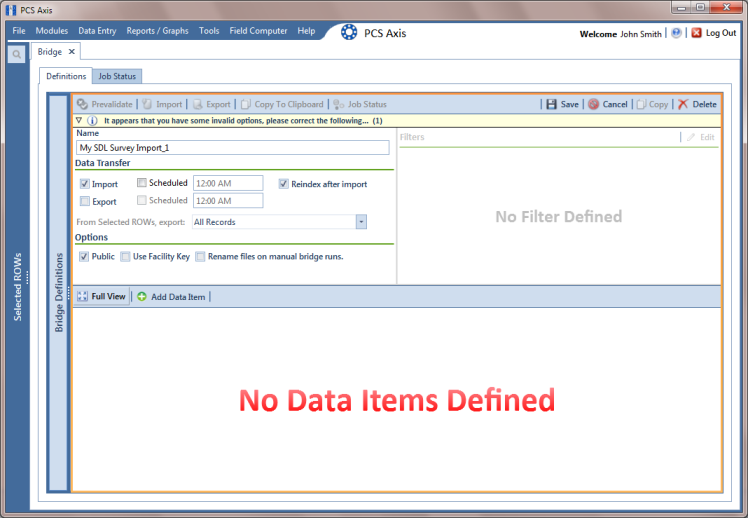
4 Type a unique name for the definition in the
Name field (
Figure 10-14).
5 Complete the following steps to set properties in the
Data Transfer group box (
Figure 10-14):
a Click the Import check box.
Note: Because SDL imports are typically run manually “on demand”, setting property settings for Scheduled option are not required.
b Click the check box Reindex after import to reindex the PCS Axis database after the import process completes.
Important: Enabling this option prevents index fragmentation from occurring in the PCS Axis database, which in turn may result in slow system performance. Index fragmentation may occur after importing large amounts of data in PCS Axis using Bridge Import, Bullhorn Bridge, or Field Computer. You can also reindex the database using the option Reindex Database in Job Service Viewer (Tools > Job Service Viewer).
Figure 10-14. Bridge Import Definition
6 Complete the following steps to set properties in the
Options group box (
Figure 10-14):
a Click the Public check box if you want the import definition file available for use by all PCS Axis users. When the check box is empty, the definition file is available only to the user who creates it.
Note: The option labeled
Use Facility Key does not apply when using Bridge to import SDLs. See
Using a Facility Key in Bridge for more information if needed.
b If you want the Bridge import process to rename the import file after importing data, click the check box Rename files on manual bridge runs.
7 Click
 Save
Save and then click
 Full View
 to hide the group boxes
Data Transfer and
Options. Clicking
Full View again displays these group boxes.
Note: Clicking the

toggle button in the

information bar displays important information related to required property settings.
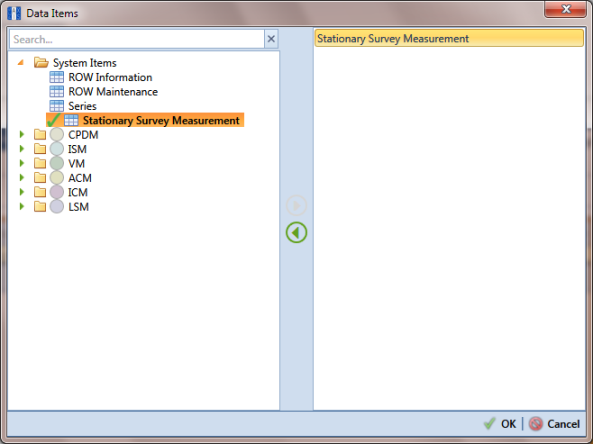
8 Select the PCS Axis data item used to import SDL survey files. Click
 Add Data Item
 to open the
Data Items window and then complete the following steps (
Figure 10-7):
a Click the

toggle arrow to open the
System Items folder (
Figure 10-15).
b Double-click Stationary Survey Measurement to move the data item to the right pane of the window.
Note: The right pane of the Data Items window lists all selected data items for import. To remove a data item for import, double-click the data item in the right pane to move it back to the left pane.
c Click
 OK
OK to close the dialog box and return to the definition panel.
Figure 10-15. Data Items
9 Click
 Save
Save to save the definition file.
10 Complete the following steps to identify the location of the SDL survey file(s) (
Figure 10-16):
a Click the ellipsis button … in the field Import File Name.
b When the Import File dialog box opens, navigate to the SDL survey file(s) and select each one you want to import. Then click Open.
Figure 10-16. Select SDL Import File
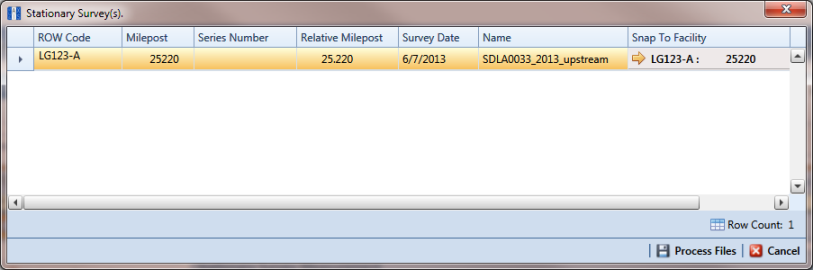
11 When the
Stationary Survey(s) window opens (
Figure 10-17), select the SDL survey file and then click the
Snap To Facility button to open the
Snap To Facility window (
Figure 10-18).
Note: A yellow
 Snap To Facility
 button indicates the SDL survey file is matched to an unregistered milepost location. A green
 Snap To Facility
 button indicates the SDL survey file has been automatically matched to a milepost location already established in PCS Axis. A blue
 Snap To Facility
 button indicates a match was not found for the pipeline segment or pipeline Series.
Figure 10-17. Stationary Survey(s)
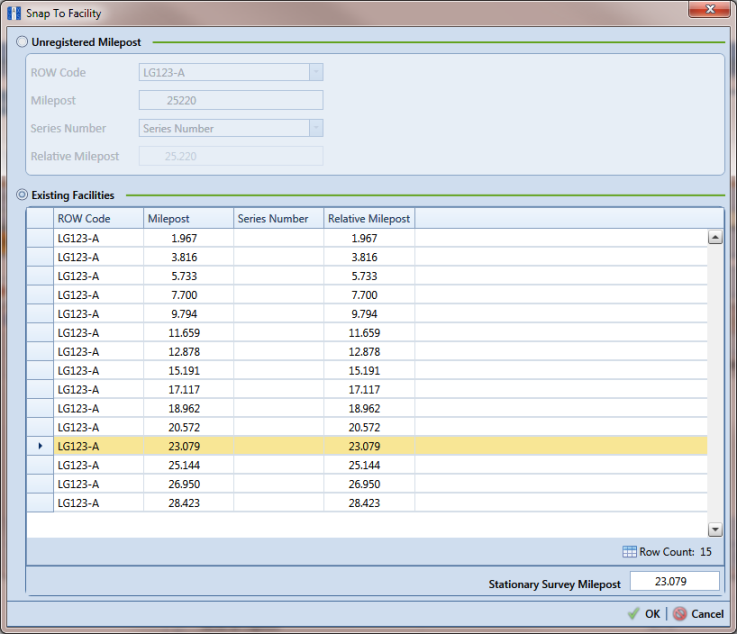
12 When the milepost location of the SDL survey
does not match a pipeline segment already established in PCS Axis, it is identified as an
UnRegistered Milepost (
Figure 10-18).
When the milepost location of the SDL survey does match an existing pipeline segment in PCS Axis, use the Snap To Facility window to match the SDL survey to a milepost location on the pipeline segment. This process ensures telluric compensation calculations are accurate.
To match the SDL survey to an existing milepost location, follow these steps:
a Click
Existing Facilities to enable the grid for use (
Figure 10-18).
b If the pipeline segment is not selected in the ROW field, click the down arrow and select the pipeline segment in the selection list.
c Select a milepost record in the grid and then click
 OK
OK to snap the SDL survey to the selected milepost.
Figure 10-18. Snap To Facility
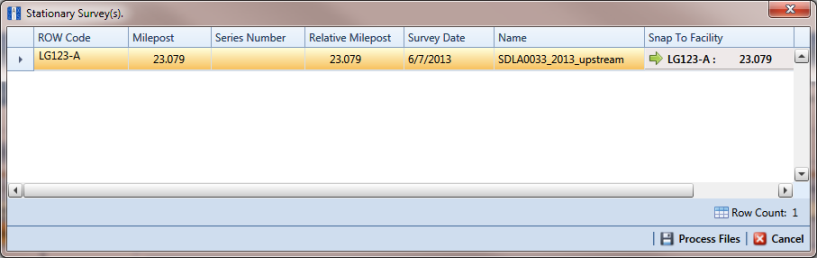
13 When the
Stationary Survey(s) window opens, click
 Process Files
 to automatically map data fields in the SDL survey with data fields in PCS Axis (
Figure 10-19).
Figure 10-19. Process Files / Stationary Survey(s)
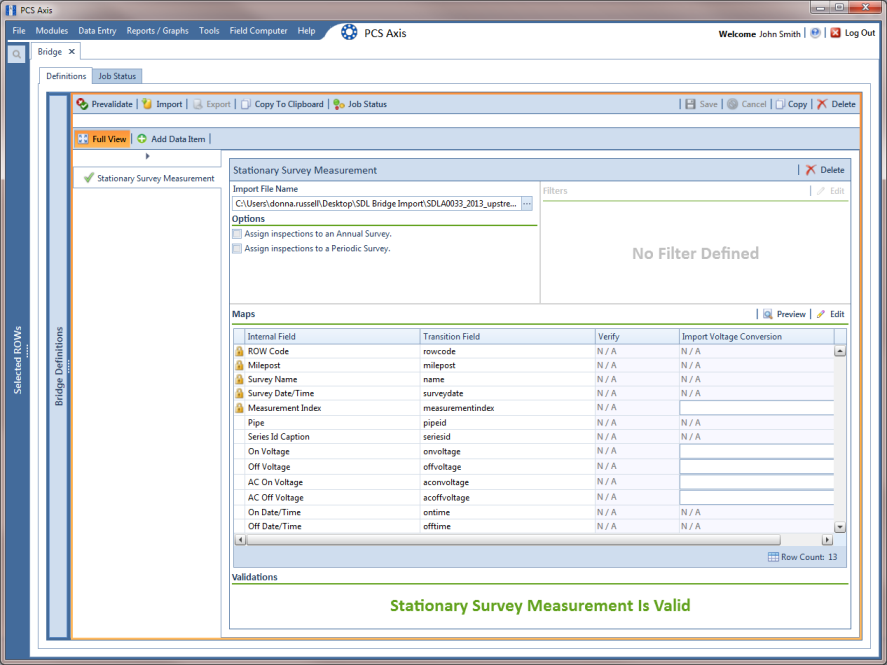
After processing files, the definition window opens. The
Maps group box includes a list of field mappings in the columns labeled
Internal Field (PCS Axis) and
Transition Field (SDL survey) as shown in the following example (
Figure 10-20).
Figure 10-20. Bridge Definition
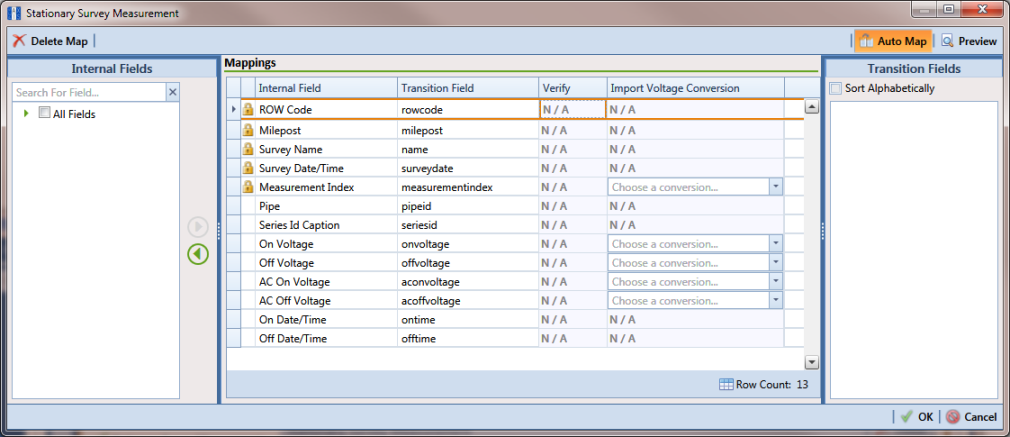
14 If you want to apply an Import Voltage Conversion filter to survey measurements (such as On Voltage survey measurements), complete the following steps:
a Click
 Edit
Edit in the
Maps group box to open the
Stationary Survey Measurement dialog box (
Figure 10-21).
Figure 10-21. Stationary Survey Measurement
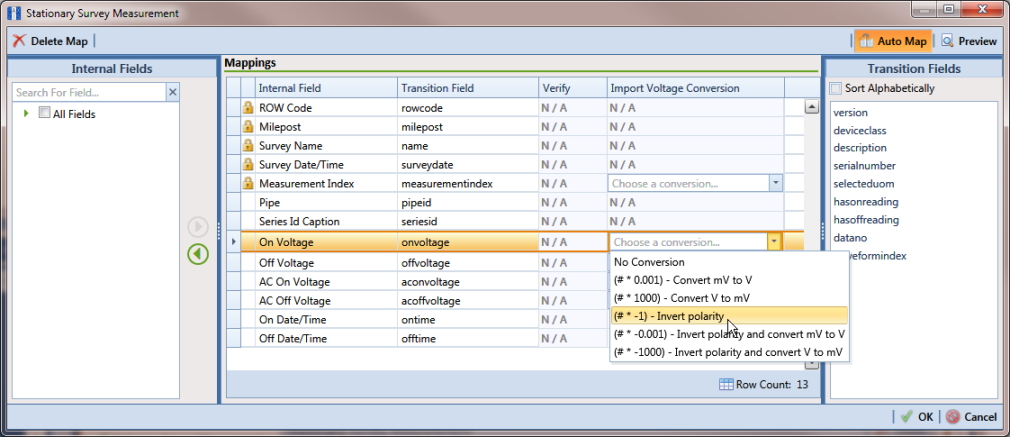
b Select a survey measurement field in the grid. Then click the down arrow in the
Import Voltage Conversion field and select one of the following filter options in the selection list (
Figure 10-22).
• No Conversion
Does not apply a voltage conversion filter.
• (# * 0.001) – Convert mV to V
Converts millivolt measurements to volts.
• (# * 1000) – Convert V to mV
Converts voltage measurements to millivolts.
• (# * –1) – Invert polarity
Reverses the polarity of survey measurement.
• (# * –0.001) – Invert polarity and convert mV to V
Reverses the polarity and converts millivolt measurements to volts.
• (# * –1000) – Invert polarity and convert V to mV
Reverses the polarity and converts voltage measurements to millivolts.
c Click
 OK
OK to apply settings and close the
Stationary Survey Measurement dialog box.
Figure 10-22. Stationary Survey Measurement
15 To assign the SDL survey to a survey folder based on the survey date, complete one or both of the following steps in the
Options group box as required (
Figure 10-20):
a If you want to assign the SDL survey to an annual survey folder, click the check box Assign inspections to an Annual Survey.
b If you want to assign the SDL Survey to a periodic survey folder, click the check box Assign inspections to a Periodic Survey.
c Click
 Save
Save to save the definition file.
16 To validate the Bridge definition, click the
 Prevalidate
 button. When the validation process completes and the following message displays, click
 View Job Status
 to open the
Job Status window or
 Return to Definition
 to open the
Definitions window (
Figure 10-23).
Note: The Prevalidate process confirms the definition file is set up correctly; it does not post data in the database. Only the first 1,000 records of the import file will be displayed.
Figure 10-23. Validated Message
17 To import the SDL survey in PCS Axis, click
 Import
 in the
Definitions window (
Figure 10-20).
18 To view the status of the Bridge session, click
 Job Status
 in the
Definitions window to open the
Job Status window (
Figure 10-24). Clicking
 Log
Log for a Bridge session opens the log file for the selected session.
Figure 10-24. Job Status
19 To copy the Bridge definition to a file, such as a Notepad or Microsoft Word file, follow these steps:
a Click the Definitions tab if the Definitions window is not open.
b Click
 Copy to Clipboard
.
c Start the software program, such as Notepad or Microsoft Word.
d Open a new file and then Paste the definition file. Click Save.