Adding the Initial Parent Picklist
Complete the following steps:
1 Click
Tools >
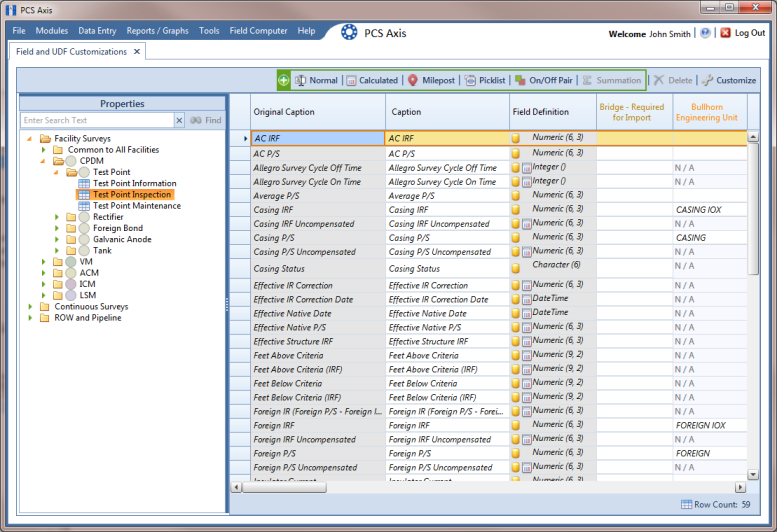
Field and UDF Customizations to open the
Field and UDF Customizations window (
Figure 3-48).
2 If you want to select a grid layout theme:
a Click
 Customize
 to open the
Column Selections dialog box (
Figure 3-32).
b Click the down arrow in Select a Layout Theme and select a theme in the selection list.
c Click
 Save
Save to close the dialog box and return to the
Field and UDF Customizations window.
3 Select an item in the
Properties panel that includes the data entry grid you want to add a
Dynamic Picklist UDF. For example, double-click
Facility Surveys >
CPDM >
Test Point > Test Point Inspection to display a grid with fields and property settings related to the
Test Point Inspection data entry grid (
Figure 3-48).
Note: Clicking the Properties bar collapses the Properties panel allowing you to view more of the grid. Clicking the bar again expands the panel.
Figure 3-48. Field and UDF Customizations
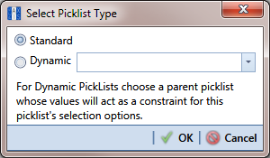
4 Click
 Picklist
 in the toolbar of the
Field and UDF Customizations window to open the
Select Picklist Type dialog box (
Figure 3-49).
5 Click
Standard and then click
 OK
OK to close the dialog box.
Figure 3-49. Select Picklist Type
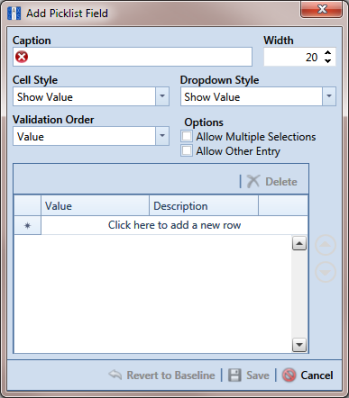
6 When the dialog box
Add Picklist Field opens, set properties for the parent picklist in the following manner (
Figure 3-50):
a Type a unique name for the parent picklist in the Caption field.
b Indicate the number of characters to allow in the name of the parent picklist. Type a value in the Width field or use the up/down arrows to select a value. Clicking the up arrow increases the value; clicking the down arrow decreases the value.
Figure 3-50. Add Picklist Field
7 Choose an option for displaying the parent picklist in data entry grids. Click the down arrow in the field Cell Style and select one of the following options in the selection list:
• Show Value: Displays the assigned value of the selected item in the picklist.
• Show Description: Displays the description of the selected item in the picklist.
• Show Value And Description: Displays the assigned value and description of the selected item in the picklist.
• Show Description And Value: Displays the description and assigned value of the selected item in the picklist.
8 Choose an option for displaying items in the parent picklist. Click the down arrow in the field Dropdown Style and select one of the following options in the selection list:
• Show Value: Displays only the assigned value of items in the parent picklist.
• Show Description: Displays only the description of items in the parent picklist.
• Show Value And Description: Displays the assigned value and description of items in the parent picklist.
• Show Description And Value: Displays the description and assigned value of items in the parent picklist.
9 Select an option for sorting items in the parent picklist. Click the down arrow in the field Validation Order and select one of the following options in the selection list:
• Value: Sorts items numerically based on values assigned to items in the parent picklist.
• Description: Sorts items alphanumerically based on the description of items in the parent picklist.
• Defined: Sorts items based on the order of items listed in the Customize Picklist dialog box.
Note: Do not enable the options Allow Multiple Selections and Allow Other Entry for the parent picklist. These options do not apply to Dynamic Picklists.
10 Complete the following steps to add data items for selection in the drop-down list of the parent picklist.
a Click the message Click here to add a new row to add an empty row of fields for data entry.
b Associate a code with the name of the data item (child picklist). Type one or more letters, numbers, or a combination of both in the Value field. Then type a description for the data item (child picklist) in the Description field.
c Press Enter on the computer keyboard to add another empty row of fields for data entry.
d Type a value in the Value field and then press the Tab key on the computer keyboard to advance the cursor to the Description field. Type a description for another data item (child picklist).
e Repeat
step 10 "c" and
"d" as needed until all data items (child picklists) have been added. When you finish, click
 Save
Save to close the dialog box and return to the
Field and UDF Customizations window.
PCS Axis adds the parent picklist in the list of other fields in the Field and UDF Customizations window.
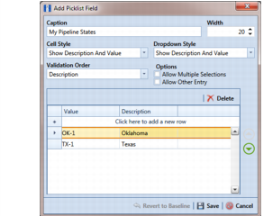
Figure 3-51. Add Picklist Field