Adding a PCS Axis User
The following procedure explains how to add a PCS Axis user in Email Notification. The process includes assigning one or more pipeline segments to the PCS Axis user. This allows PCS Axis to send email reports that include data only for those pipeline segments assigned to the PCS Axis user.
Complete the following steps:
1 Click Tools > Email Notification to open the Email Notification window.
2 Click
 Add Pcs Axis User
 to display a list of PCS Axis users. All PCS Axis users added in
User Management (
Tools >
User Management) display in the center panel of the
Email Notification window.
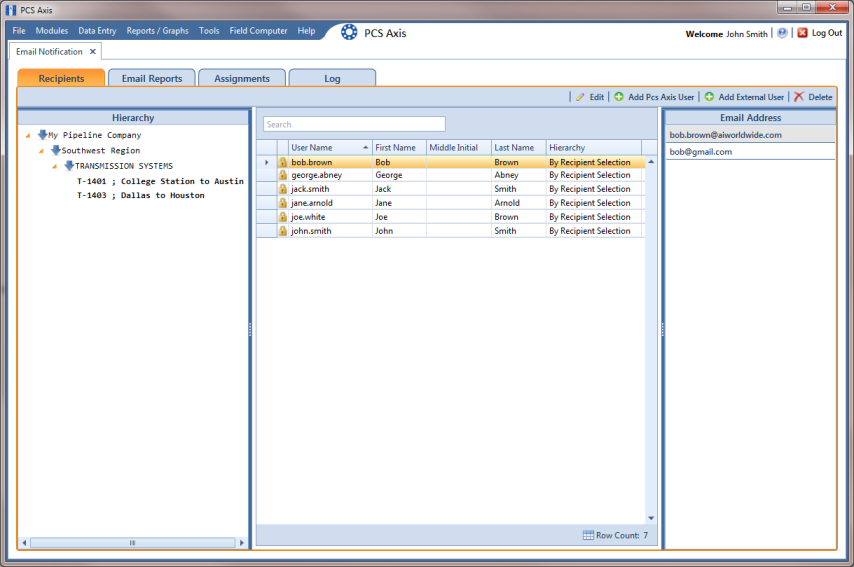
3 Select a user name in the center panel (
Figure 12-1).
Figure 12-1. Recipients / Add PCS Axis User
4 If PCS Axis is set up with Hierarchical Security in system Options (Tools > Options), click the down arrow in the Hierarchy field and select one of the following options. Your selection determines which pipeline segments are assigned to the user.
• Select By Hierarchy Security if you want to use the same pipeline segments assigned to the user in Hierarchy Rights of User Management (Tools > User Management).
• Select By Recipient Selection if you want to assign one or more pipeline segments to the PCS Axis user in the Hierarchy panel of the Recipients tab.
5 If
By Recipient Selection is selected in the
Hierarchy field, click the

toggle arrow in the
Hierarchy panel to view a list of pipeline segments in the hierarchy. Click the check box for each pipeline segment you want to assign to the user.
A check mark inside the check box indicates a selection. To clear a selection, click the check box to remove the check mark.
Note: Clicking the

toggle button in the

information bar displays information related to required property settings.
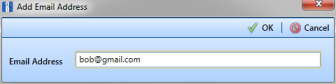
6 If you want to add an additional email address for the PCS Axis user, complete the following steps:
a Click
 Add Email
 to open the
Add Email Address dialog box (
Figure 12-2).
Figure 12-2. Add Email Address
b Type an email address in the
Email Address field and then click
 OK
OK. Repeat this step as needed to add another email address.
7 Click
 Save
Save to save changes.
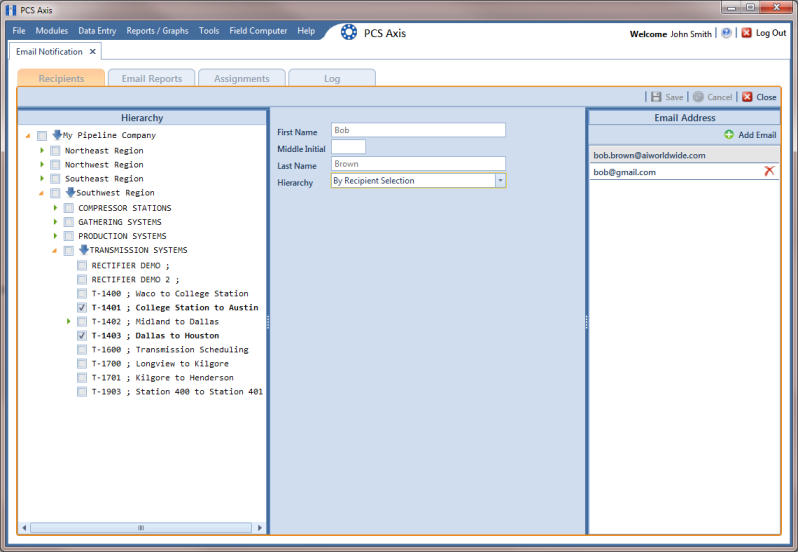
The
Email Address panel displays all email addresses set up for a user selected in the center panel (
Figure 12-3).
Figure 12-3. Recipients / Email Address