Attaching a Document to a ROW, Facility, Inspection,
or Maintenance Record
Information in this section explains how to attach a document to a record in the grid using the options Link Document and Embedded Document.
Note: If the option
Disable Link Attachments has been enabled in system Options by your company's system administrator, the option
Link Document is unavailable for selection. Use the option
Embedded Document instead when attaching a document to a record. This places a copy of the document in the PCS Axis database.
Complete the following steps:
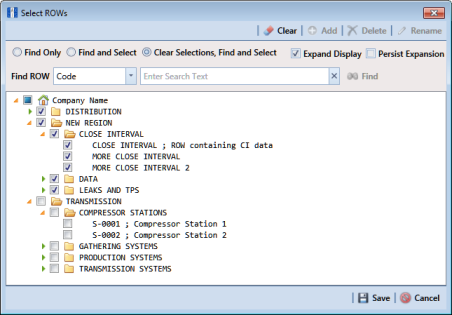
1 Select one or more pipeline segments in the
Select ROWs window (
Figure 7-132). Click
 Save
Save to close the window.
Figure 7-132. Select ROWs
2 Click Data Entry > Edit <module> Data, such as Edit CPDM Data. If present, click a facility type button, such as Test Point in CPDM or Coupons in ICM.
3 Based on the type of record you want to attach a document, complete one of the following steps:
a To attach a document to a ROW or facility record, click the
Information tab

to open the
Information grid.
b To attach a document to an inspection record, click the
Inspection tab

to open the
Inspection grid.
c To attach a document to a maintenance record, click the
Maintenance tab

to open the
Maintenance grid.
4 If you want to collapse the Selected ROWs panel to view more of the grid, click the Selected ROWs bar. Clicking the bar again expands the panel.
5 Click the edit icon

in the
Attached Documents field for the grid record you plan to attach a document (
Figure 7-133).
Figure 7-133. Attached Document Field
6 When the
Maintain Attached Documents dialog box opens, click
 Attach
 and then select the option
Link Document or
Embedded Document.
Select Link Document if you plan to link to a document on a local computer or company network, or want to add a link to a web page on the Internet.
Select Embedded Document if you want to store a copy of an attached document in the PCS Axis database.
Note: Storing copies of attached documents in the database increases the size of the database.
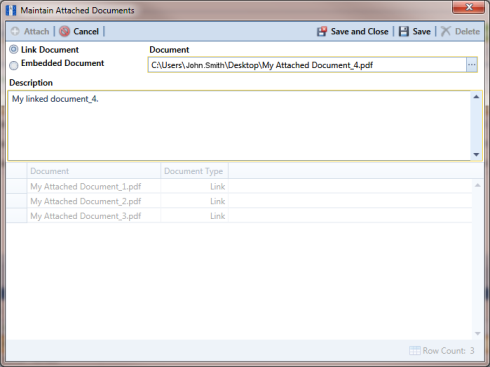
7 If you selected
Link Document in
step 6 and want to link to a file on a local computer or company network(
Figure 7-134), follow these steps:
Figure 7-134. Maintain Attached Documents
a Click the ellipsis button … in the Document field to open the Link File dialog box.
b Navigate to the file and select it. Click Open to link to the file and close the dialog box.
c Type a description for the linked file in the Description field. When a description is not provided, PCS Axis uses the filename of the linked document as the description.
d Click
 Save
Save, then click
OK when the following message displays:
Linked Document won’t be replicated. Do you want to continue?
Note: Linked documents are not copied and stored in the PCS Axis database as noted in the previous message. To store a copy of an attached document in the database, use the Embedded Document option instead.
e When you finish attaching documents, click the close button

to close the window and return to the grid.
Note: A list of attached documents and whether they are linked or embedded displays in the window. Selecting an item in the list displays its location in the Document field.
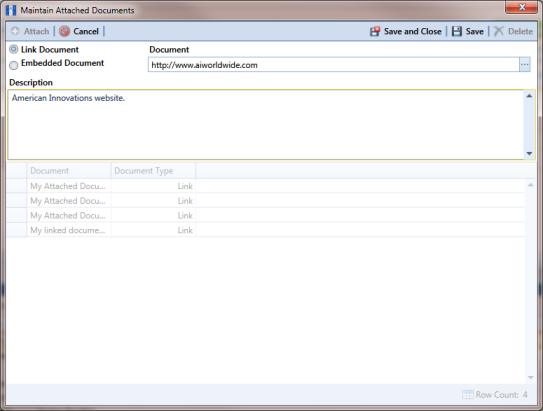
8 If you selected
Link Document in
step 6 and want to add a link to a web page on the Internet (
Figure 7-135), follow these steps:
Figure 7-135. Maintain Attached Documents
b Type a description for the link in the Description field. When a description is not provided, PCS Axis uses the filename of the linked document as the description.
c Click
 Save
Save, then click
OK when the following message displays:
Linked Document won’t be replicated. Do you want to continue?
Note: Linked documents are not copied and stored in the PCS Axis database as noted in the previous message. To store a copy of an attached document in the database, use the Embedded Document option instead.
d When you finish attaching documents, click the close button

to close the window and return to the grid.
Note: A list of attached documents and whether they are linked or embedded displays in the window. Selecting an item in the list displays its location in the Document field.
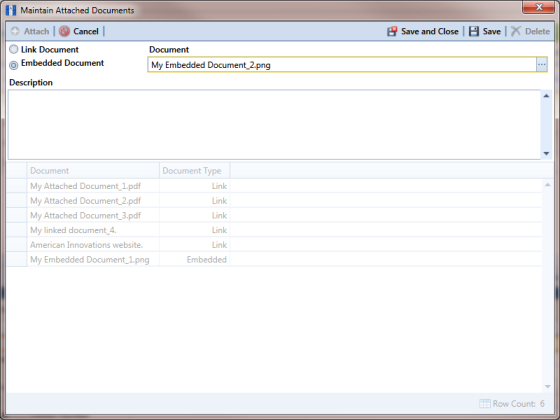
9 If you selected
Embedded Document in
step 6 (
Figure 7-136), complete the following steps:
Figure 7-136. Maintain Attached Documents
a Click the ellipsis button … in the Document field to open the Embed File dialog box.
b Navigate to the file and select it. Click Open to embed a copy of the file and close the dialog box.
c Type a description for the embedded file in the Description field. If a description is not provided, PCS Axis uses the filename of the embedded file as the description.
d Click
 Save
Save, then click
OK when the following message displays:
Local changes made to embedded documents won’t be saved into PCS. Do you want to continue?
Note: Editing an embedded document applies changes only to the copy stored in the PCS Axis database; changes do not apply to the source file stored outside of PCS Axis. Likewise, editing a source file applies changes only to the source file, not the copy stored in PCS Axis.
e When you finish attaching documents, click the close button

to close the window and return to the grid.
Note: A list of attached documents and whether they are linked or embedded displays in the window. Selecting an item in the list displays its location in the Document field.