Adding a Columnar Report Layout Theme
A columnar report layout theme is a group of report settings saved in a theme for later use. Settings include choosing which fields to include in the report, paper settings, and print options. The following procedure applies to a columnar report layout theme for any columnar report in PCS Axis.
Complete the following steps:
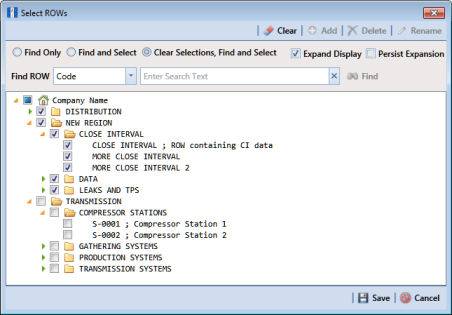
1 Select one or more pipeline segments in the
Select ROWs window (
Figure 16-30). Select pipeline segment(s) with facilities you want to include in the report. Click
 Save
Save to close the window.
Figure 16-30. Select ROWs
2 Select the report you want to work with in the Reports/Graphs menu. Click Report/Graphs and then select a report in the list.
For example, click Reports/Graphs > Test Point Reports > Test Point Inspection Report.
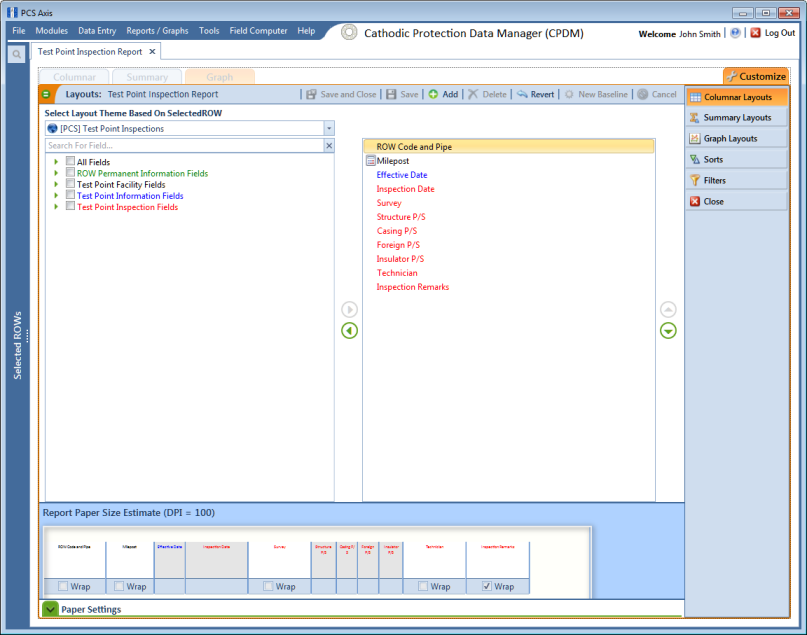
3 Click the
Customize tab

, and then the
Columnar Layouts button

to open the
Layouts page (
Figure 16-31).
Figure 16-31. Report Layouts
Note: Setting up a Graph Layouts theme is unavailable in the current release of the PCS Axis software.
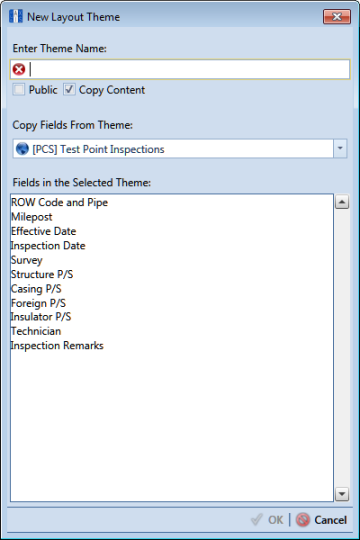
4 Click
 Add
Add to open the
New Layout Theme dialog box (
Figure 16-32).
Figure 16-32. New Layout Theme
5 Type a name for the layout theme in the field Enter Theme Name. This field is required.
6 If you want to create a public theme, click the Public check box to place a check mark inside the check box. When the check box is empty, the layout saves as a private theme.
Note: Themes are either public or private. A public theme is available for use by all PCS Axis users. A private theme is available only to the user who creates it.
7 Select a layout theme with fields you want to copy to the new layout theme. Click the Copy Content check box and then click the down arrow in Copy Fields From Theme and select a theme in the selection list.
8 Click
 OK
OK to save changes and return to the
Layouts page.
9 Complete the following steps to add and remove fields in the report layout theme as needed (
Figure 16-33):
a Click the toggle arrow

for a field category in the left pane of the window to view a list of fields available for selection. For example, click
 All Fields
.
b Double-click a field in the left pane to move it to the right pane. Repeat this step as needed. The report layout theme includes all fields in the right pane of the Layouts page.
c To remove a field in the layout theme, double-click a field in the right pane to move it to the left pane. Repeat this step as needed.
d To change the order of fields in the right pane and subsequently in the grid, click and drag a field to a new position in the list. Or, select a field and then click the up

or down

button.
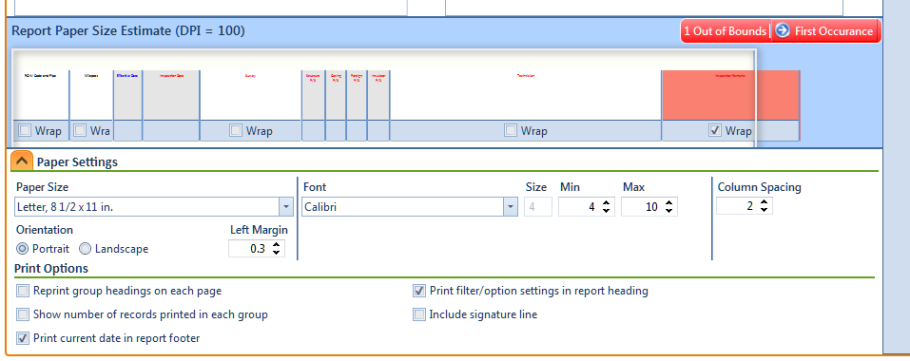
10 Click the Wrap check box in Report Paper Size Estimate for each field you want text to wrap, such as Inspection Remarks.
11 Click
 Paper Settings
 to open the property settings panel (
Figure 16-33).
Figure 16-33. Paper Settings
12 Set options as needed in the Paper Settings and Print Options group boxes. Adjusting the Min and Max settings in the Font group box allows you to increase or decrease the font size.
13 To adjust the width of report columns, follow these steps:
a Place the mouse over a column boundary to change the cursor to a horizontal resize cursor

.
b Click and drag a column boundary to adjust the width of the report column.
c If the adjustment extends report columns outside of the page, a red “out of bounds” message displays
(Figure 16-34). Click and drag the column boundary to make adjustments as needed to clear the message.
Figure 16-34. Out of Bounds Warning
14 Click the Wrap check box in the group box labeled Report Paper Size Estimate for each field you want text to wrap, such as Inspection Remarks.
15 Click
 Save and Close
 to save changes and return to the report options window.
16 To apply the layout theme to the report, click the down arrow in Select Layout Theme and select the new layout theme in the selection list.