Sending a Survey to the Allegro Based on a Route
Information in this section explains how to send a survey to the Allegro based on a route with facilities that include inspection GPS fields. The process includes adding a prompts theme with prompts for inspection GPS fields. Prompts are data entry fields in an Allegro survey file that require survey data, such as GPS data for each facility inspection reading.
Complete the following steps:
1 Verify the Allegro is connected to your computer. If needed, refer to the Allegro User Guide for information about how to connect the device.
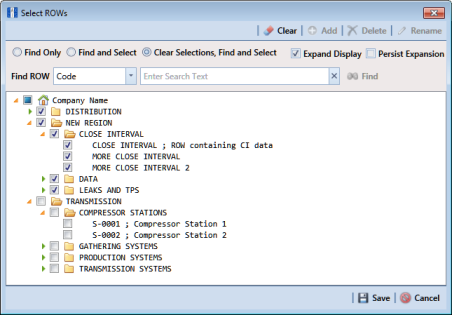
2 Select one or more pipeline segments in the
Select ROWs window (
Figure 8-37). Select pipeline segments with facilities you plan to survey. Click
 Save
Save to close the window.
Figure 8-37. Select ROWs
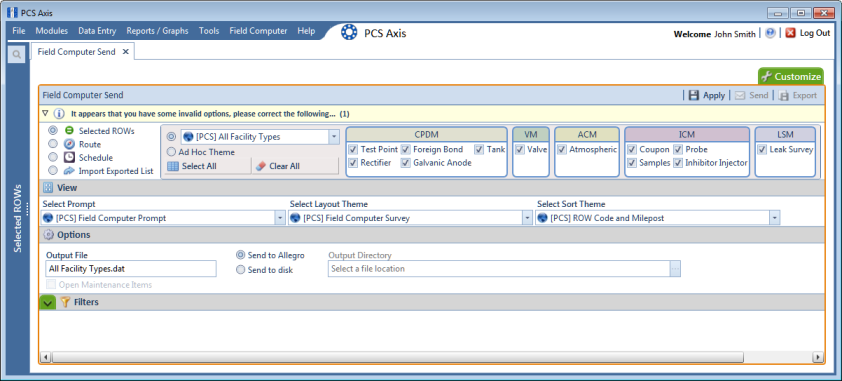
3 Click
Field Computer >
Send to open the
Field Computer Send window (
Figure 8-38).
Figure 8-38. Field Computer Send
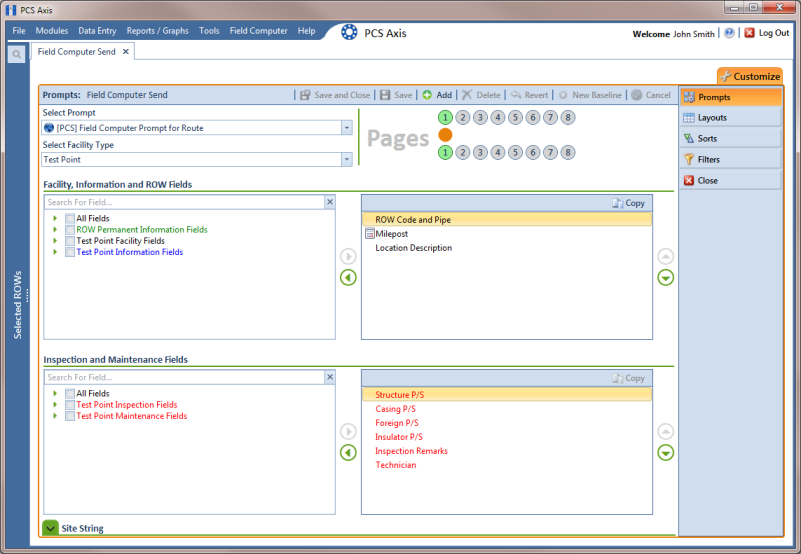
4 Click the
Customize tab

, then the
Prompts button

to open the
Prompts page (
Figure 8-39).
Figure 8-39. Prompts
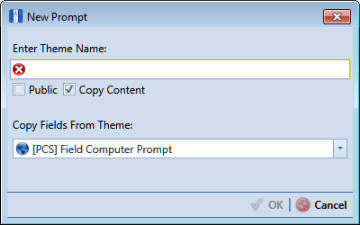
5 Click the
 Add
Add button to open the
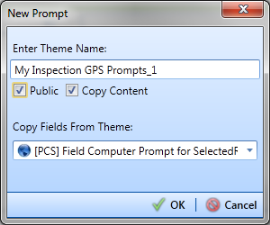
New Prompt dialog box (
Figure 8-40). Required fields are identified with the

icon and must be completed to continue.
Figure 8-40. New Prompt
6 Type a name for the theme in the field
Enter Theme Name (
Figure 8-41).
Figure 8-41. New Prompt
7 If you want to create a public theme, click the Public check box to place a check mark inside the check box. When the check box is empty, the theme saves as a private theme.
8 If you want to copy fields from an existing theme, click the Copy Content check box to place a check mark inside the check box. Then click the down arrow in the field Copy Fields From Theme and select a theme in the selection list.
If you do not want to copy fields from an existing prompt theme, remove the check mark inside the Copy Content check box by clicking the check box.
9 Click
 OK
OK to save changes and return to the
Prompts page.
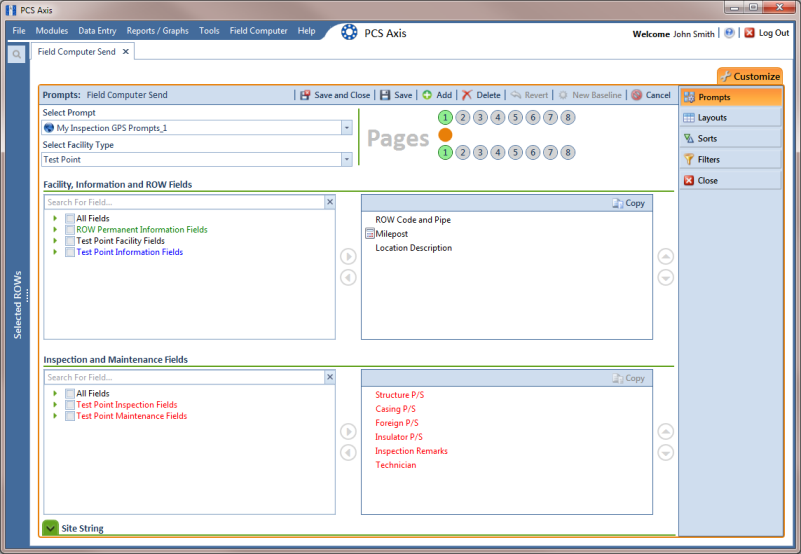
10 Verify the name of the new theme displays in the
Select Prompt field. If not, click the down arrow and select the theme in the selection list (
Figure 8-42).
11 Click the down arrow in Select Facility Type and select a facility type in the selection list. For example, select Test Point.
Figure 8-42. Prompts
12 To add information prompts, follow these steps (
Figure 8-42):
a Double-click
 All Fields
 in
Facility, Information and ROW Fields to view a list of fields available for selection.
b Double-click one or more fields in the selection list to move fields to the right pane. All fields listed in the right pane are included in the prompt theme.
13 To add inspection GPS prompts, follow these steps:
a Double-click
 All Fields
 in
Inspection and Maintenance Fields.
b Double-click the following inspection GPS fields to move the fields to the right pane:
• Inspection Elevation
• Inspection GPS Accuracy
• Inspection GPS Difference
• Inspection Latitude
• Inspection Longitude
Note: If you want to remove information, inspection, or maintenance fields, double-click a field listed in the right pane to move it back to the left pane.
14 Complete the following steps to add site string prompts that help identify one facility from another when using the Allegro. Site string prompts are included with each facility and can be viewed in the Allegro Site List window.
a Click the
 Site String
 and then double-click
 All Fields
 in the left pane to view a list of fields available for selection (
Figure 8-42).
b Double-click one or more fields in the left pane to move fields to the right pane. For example, double-click
Facility ID and
Facility Location. Click the
 Site String
 button again to close the pane.
15 If you want to add another page of prompts, click
 Copy
Copy and then double-click one or more fields as needed in the left pane of
Inspection and Maintenance Fields. Information fields in
Facility, Information, and ROW Fields automatically copy to each page of prompts (
Figure 8-42).
16 Click
 Save
Save.
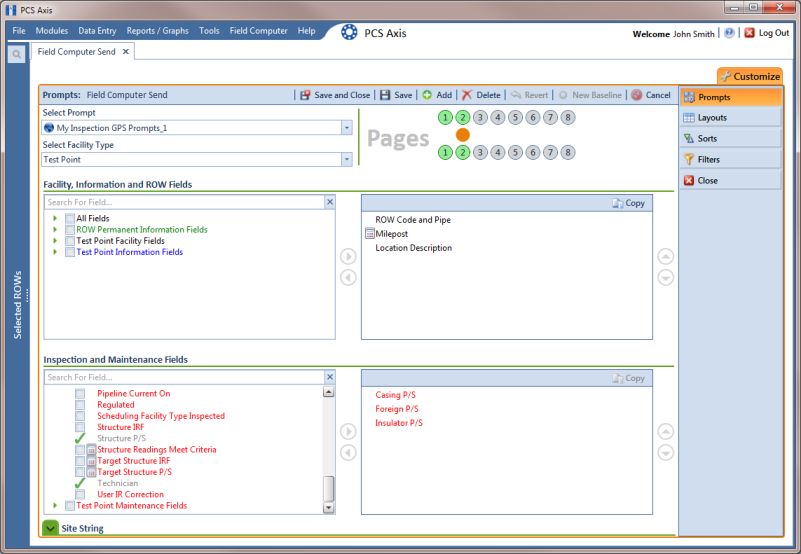
17 If you have multiple pages of prompts, clicking a page number icon displays prompts for the selected page. For example, clicking

displays prompts set up in page 2 as shown in the following example (
Figure 8-43).
Figure 8-43. Prompts
18 Click
 Close
Close to return to the
Field Computer Send window.
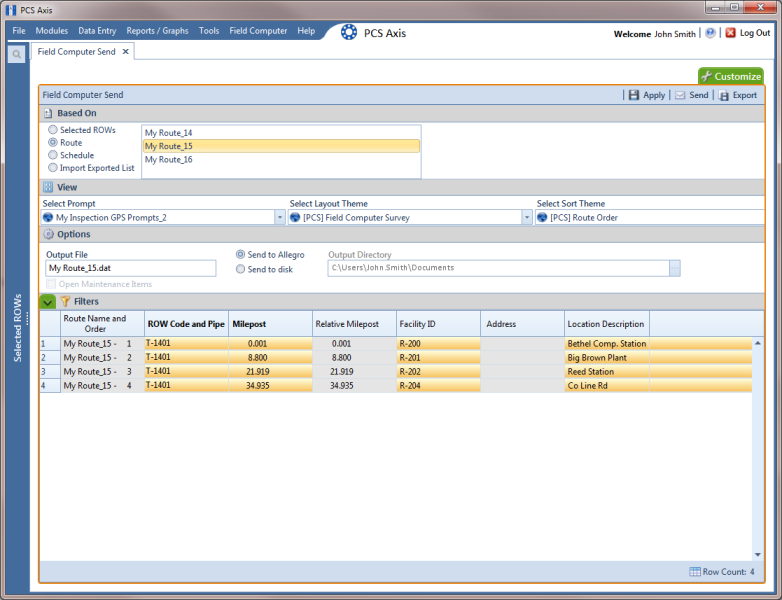
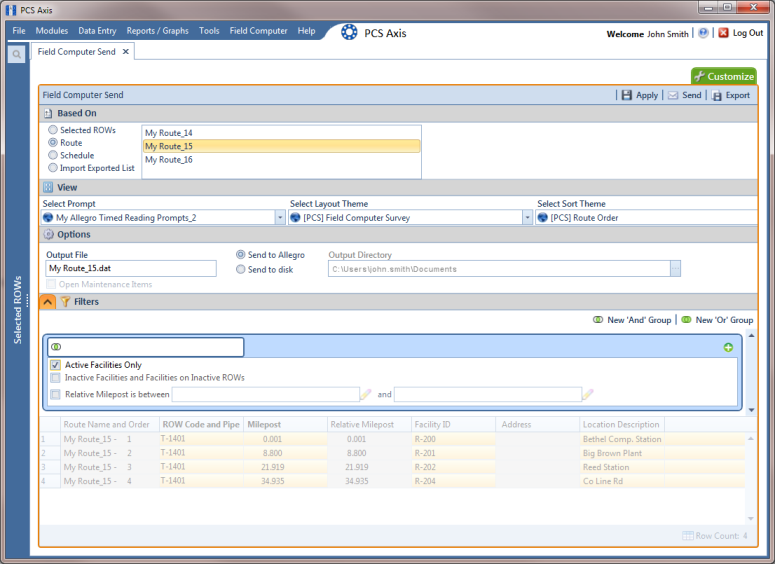
19 Click the
Route option and select a route in the selection box. Then click
 Apply
Apply to update the grid (
Figure 8-44).
20 Complete the following steps to select a prompt, layout, and sort theme:
a Click the down arrow in Select Prompt and select the prompt theme with inspection GPS fields.
b Click the down arrow in Select Layout Theme and select a layout theme in the selection list.
c Click the down arrow in Select Sort Theme and select a sort theme in the selection list.
21 If you want to rename the survey file, type a name in the field Output File.
22 Select Send to Allegro to send the survey file to the Allegro.
23 If the check box Open Maintenance Items is available for selection, click the check box if you want to include open maintenance records in the survey file.
Note: When the selected prompt theme includes maintenance prompts, the check box Open Maintenance Items is available for selection. It is disabled when maintenance prompts are not included in the currently selected prompt theme.
Figure 8-44. Field Computer Send
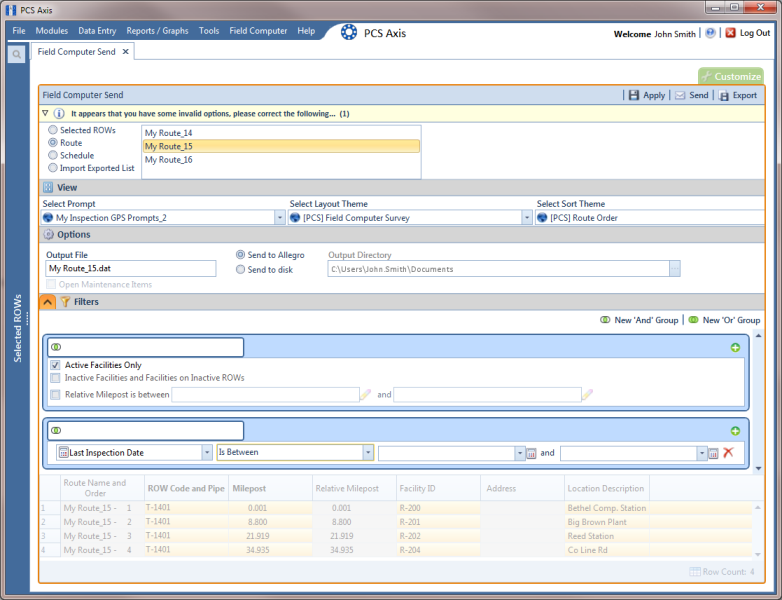
24 If you want to filter records in the grid and in the route sent to the Allegro, complete the following steps.
Important: Filter settings in
Field Computer Send apply only to the current session and are not saved. See
Working with Themes and Filter Groups for information about saving filter settings in a theme.
a Click the
 Filters
 tab to open the
Filters panel (
Figure 8-44).
Figure 8-45. Filters
b Select one or more options in
Filters. For example, click
Currently Active Facilities Only to only include active facilities in the grid and in the route sent to the Allegro (
Figure 8-45).
c If you want to add a new AND or OR filter group, continue with one of the following steps. Otherwise continue with
step 27.
• To add a new AND filter group continue with
step 25.
• To add a new OR filter group continue with
step 26.
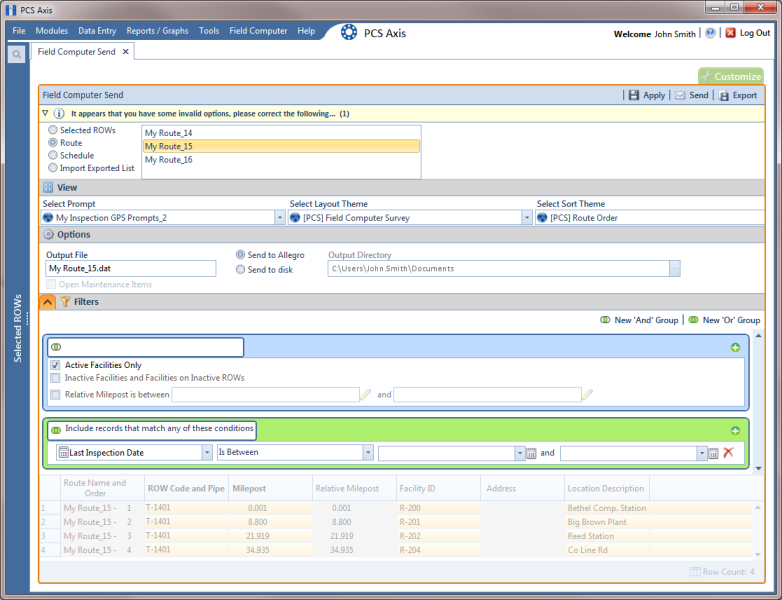
25 If you want to add a new AND filter group, complete the following steps. With an AND filter group, PCS Axis includes a subset of records that meet
all filter conditions defined for the filter group. Records are filtered in the grid and in the route sent to the Allegro (
Figure 8-46).
a Click
 New ‘And’ Group
 to open the filter properties group box.
b Use filter selection fields to set up filter criteria. Select a PCS Axis field, operator, and one or more filter conditions.
When adding a date filter, such as Last Inspection Date Is Between, set a date range using one of the following methods:
• Type a date in the start and end date fields. Enter a start and end date using the format M/DD/YYYY to indicate the month, day, and year.
• To set a date range using a calendar, click the down arrow in the start date field to open a calendar and select a start date. Then click the down arrow in the end date field to open a calendar and select an end date.
• To set a date range using dynamic start and end dates, click the

calculator button in the start date field and set up dynamic date properties. Repeat this step for the end date field. Clicking the calculator button opens and closes dynamic date property fields.
Note: Clicking the

toggle button in the

information bar displays important information related to required settings.
Figure 8-46. New ‘And’ Filter Group
26 If you want to add a new OR filter group, complete the following steps. With an OR filter group, PCS Axis includes a subset of records that meet
any filter condition defined for the filter group. Records are filtered in the grid and in the route sent to the Allegro (
Figure 8-47):
a Click
 New ‘Or’ Group
 to open a filter properties group box.
b Use filter selection fields to set up filter criteria. Select a PCS Axis field, operator, and one or more filter conditions.
When adding a date filter, such as Last Inspection Date Is Between, set a date range using one of the following methods:
• Type a date in the start and end date fields. Enter a start and end date using the format M/DD/YYYY to indicate the month, day, and year.
• To set a date range using a calendar, click the down arrow in the start date field to open a calendar and select a start date. Then click the down arrow in the end date field to open a calendar and select an end date.
• To set a date range using dynamic start and end dates, click the

calculator button in the start date field and set up dynamic date properties. Repeat this step for the end date field. Clicking the calculator button opens and closes dynamic date property fields.
Note: Clicking the

toggle button in the

information bar displays important information related to required settings.
Figure 8-47. New ‘Or’ Filter Group
27 Click the
 Filters
 tab to close the
Filters panel. Then click
 Apply
Apply to update the grid.
28 Click
 Send
Send to send the survey file to the Allegro.
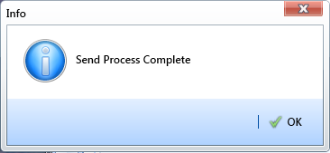
29 Click
 OK
OK when the message
Send Process Complete displays (
Figure 8-48). PCS Axis sends the survey file to the
PSData folder on the Allegro.
Figure 8-48. Send Process Complete