Using Rubber Band
Use Rubber Band to adjust a range of station numbers by stretching or shrinking sections of a survey so that station numbers line up with known points along the survey or existing facilities.
Using Rubber Band allows you to re-align station numbers for a selected survey. After entering known station numbers for the first, last, and any other station numbers in between, Rubber Band adjusts remaining station numbers in a linear manner between known station numbers. Station numbers are then listed in ascending order (lowest to highest).
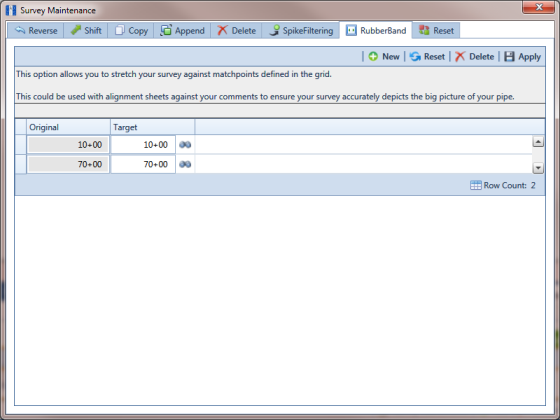
When you first use Rubber Band, the fields labeled Original and Target include two match point records by default. These match point records are the first and last station numbers in the selected survey. Station numbers in the Original field are the original station numbers initially stored in PCS Axis as a result of importing survey data, entering survey data manually, or receiving survey data from the Allegro Field PC. Station numbers in the Target field are the corrected or adjusted station numbers that you enter or are entered as a result of the Rubber Band feature.
To adjust a range of station stations using the Rubber Band function, follow these steps:
1 Click the
Select ROWs button

to open the
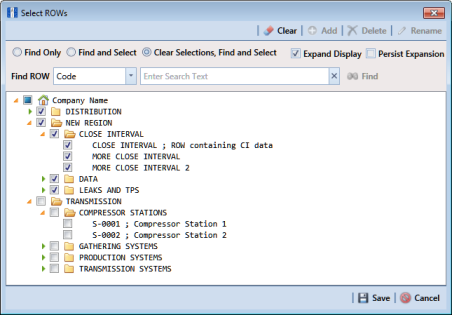
Select ROWs window (
Figure 7-95). Select the pipeline segment(s) with the facilities you want to work with, then click
 Save
Save to close the window.
Figure 7-95. Select ROWs
2 If the ISM module is not open, click Modules > Indirect Survey Manager (ISM).
3 Click
Data Entry >
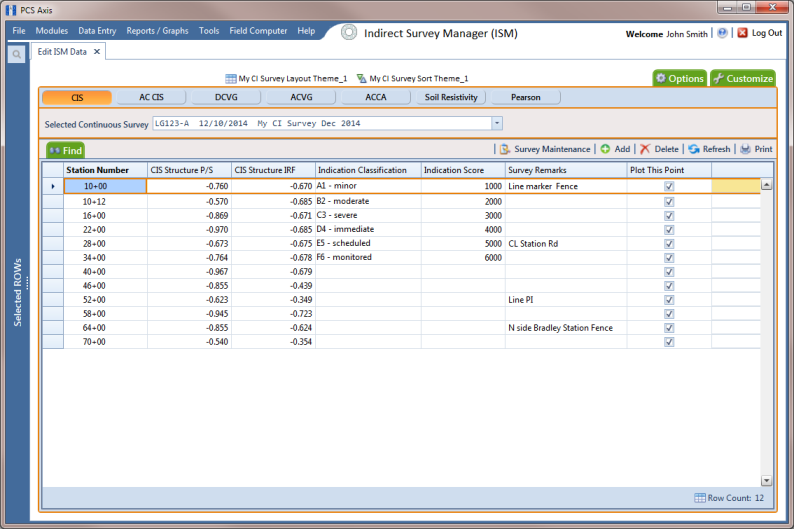
Edit ISM Data to open the ISM data entry grid. Then click a button labeled with the type of continuous survey data you want to work with, such as the
CIS button

(
Figure 7-96).
4 Select a survey folder with station numbers you want to apply the Rubber Band function. Click the down arrow in Selected Continuous Survey and select a survey folder in the selection list.
Note: If you want to collapse the Selected ROWs panel, click the Selected ROWs bar. Clicking the bar again expands the panel.
Figure 7-96. Edit ISM Data
5 Click
 Survey Maintenance
 to open the
Survey Maintenance dialog box. Then click
 RubberBand
 (
Figure 7-97).
6 Complete the following steps to re-align station numbers in a survey:
a To re-align the first station number in the survey, type a new station number in the Target field of the first station number.
If you want to re-align the first station number to an existing facility instead, click

the find button to open the
Select Facility dialog box and select a facility in the grid. Then click
 Save
Save.
b To re-align the last station number in the survey, type a new station number in the Target field of the last station number.
If you want to re-align the last station number to an existing facility instead, click

the find button to open the
Select Facility dialog box and select a facility in the grid. Then click
 Save
Save.
c To add new match points for known station numbers, click
 New
New to add empty
Original and
Target match point fields. Then type the station number you want to re-align in the
Original field and the adjusted (or corrected) station number in the
Target field.
If you want to re-align the adjusted station number to an existing facility instead, click

the find button to open the
Select Facility dialog box and select a facility in the grid. Then click
 Save
Save.
d To delete a row of match points, select the row and then click
 Delete
.
Note: Clicking
 Reset
Reset before clicking
Apply resets station numbers to their original values.
e Click
 Apply
Apply. When the
Apply message displays, click
 OK
OK to continue or
 Cancel
 to cancel the operation.
7 Click
 Refresh
 to update data in the grid.
Figure 7-97. Rubber Banding